Make elements do things with Actions
Make a button or another element do something when people use it, such as show a message, go to another page, hide or show another element, call an API or run a workflow. You build these steps visually as a flow in the Flow Builder, without writing code.
Before you start
- You need to be able to open your app's Customize tab (usually a team admin).
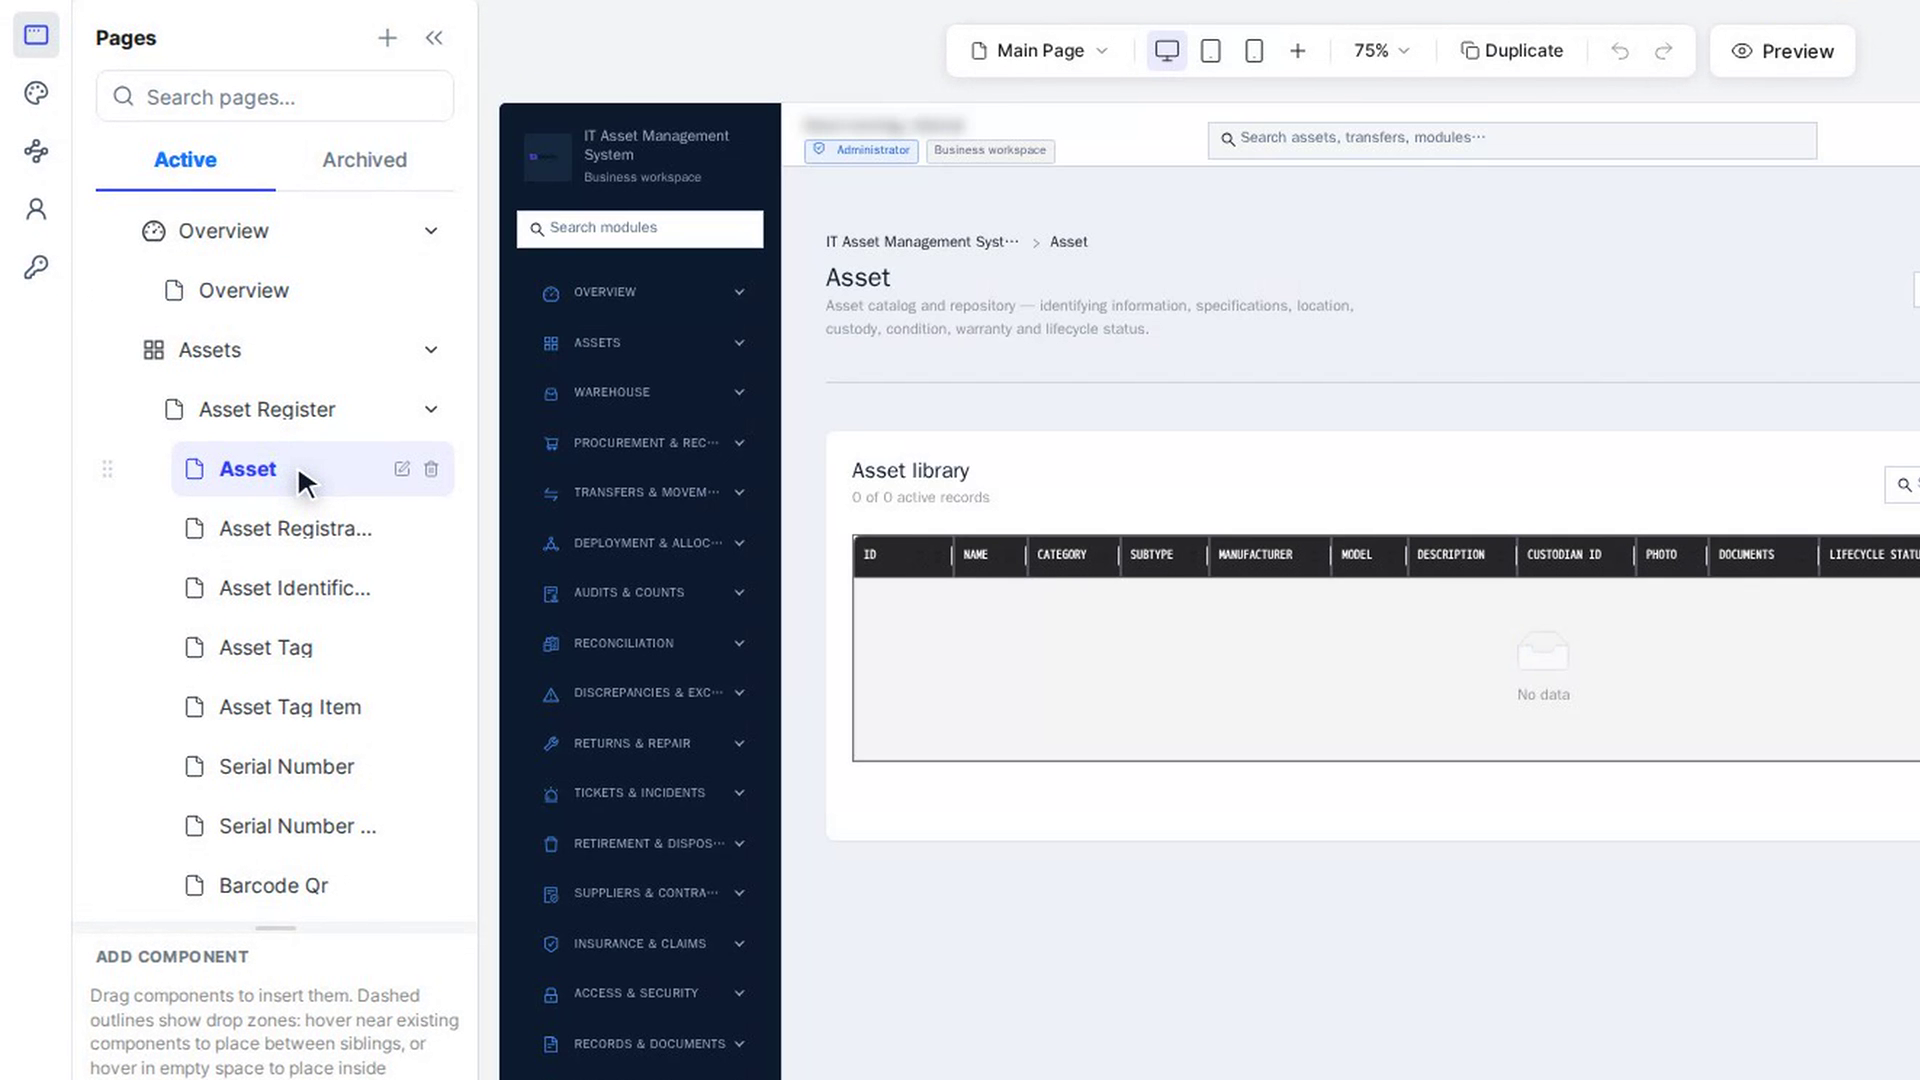
- Open the page that holds the element, from the Pages list on the left.
Steps
Open the Flow Builder from an element
Click the element on the canvas, for example a button. In the small toolbar that appears above it, select Actions (the lightning icon, Use this element in a flow).
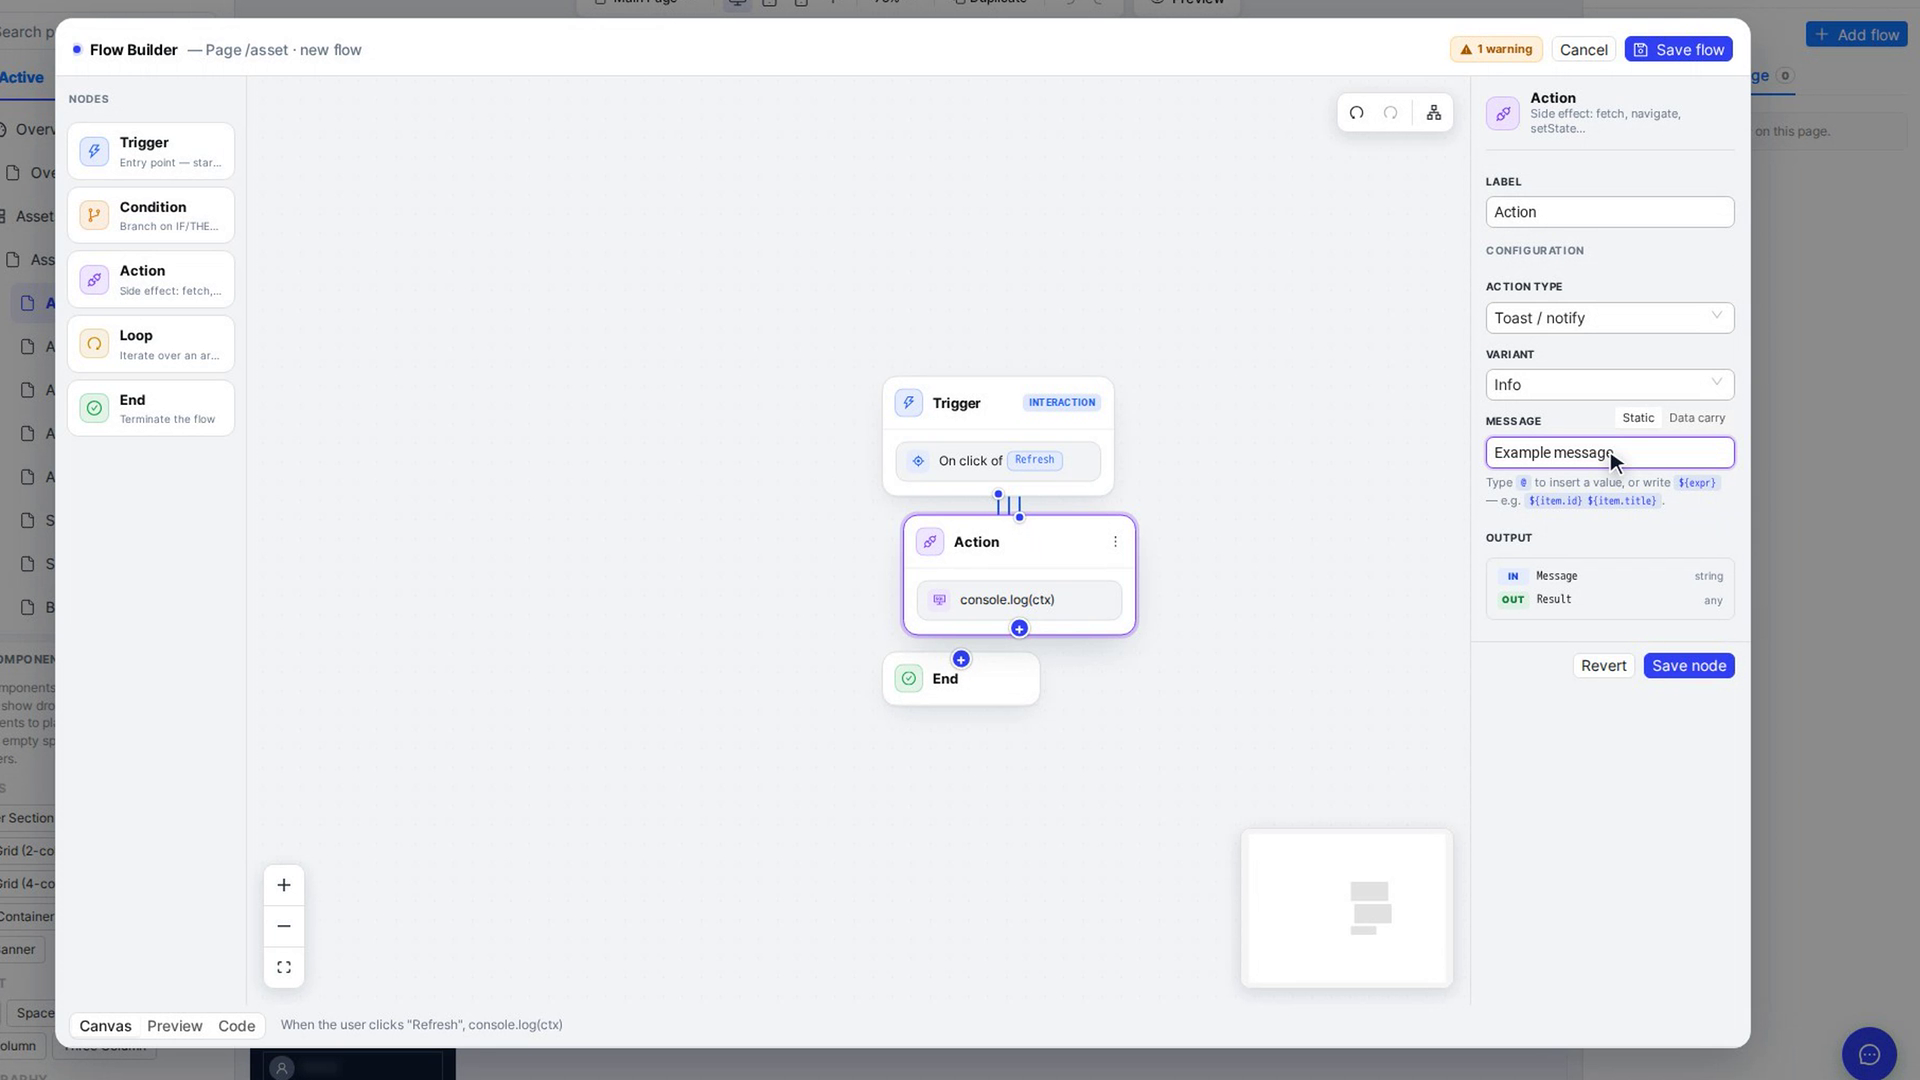
The Flow Builder opens on a new flow for this page, named after the element, for example When "Refresh" clicked. The title bar reads Flow Builder — Page … · new flow.
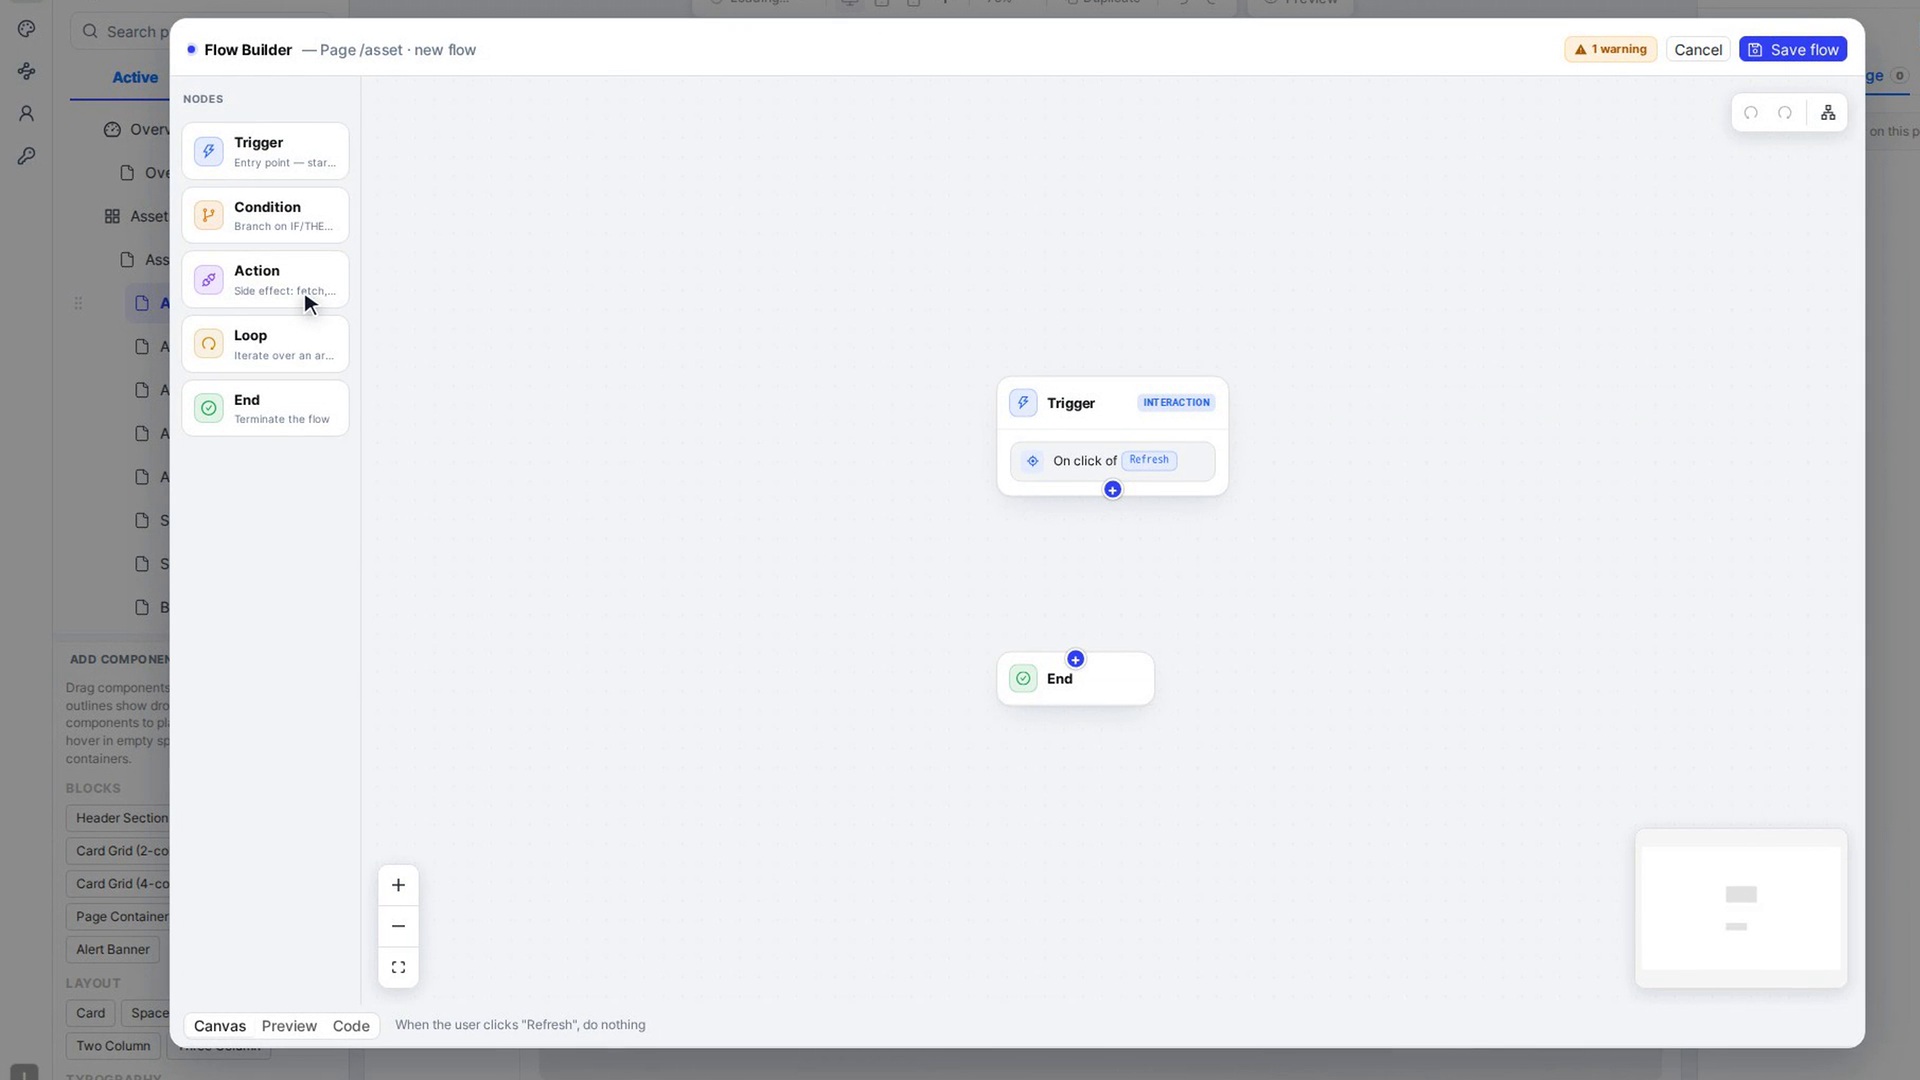
Get to know the Flow Builder
- Nodes, on the left, lists the building blocks you can drag onto the canvas: Trigger (starts the flow), Condition (an IF / ELSE branch), Action (does something), Loop (repeats for each item in a list) and End.
- The canvas in the middle shows the flow as connected boxes. A new flow already has a Trigger and an End. The buttons at the top right undo, redo and tidy up the boxes (Auto-organize nodes); the buttons at the bottom left zoom in, zoom out and fit the flow to the screen.
- When you click a box, its settings open on the right.
- The bar at the bottom switches between Canvas, Preview and Code, and sums up the flow in plain words, for example When the user clicks "Refresh", do nothing.
- At the top right are a badge that counts warnings and errors, Cancel and Save flow.
Set the trigger
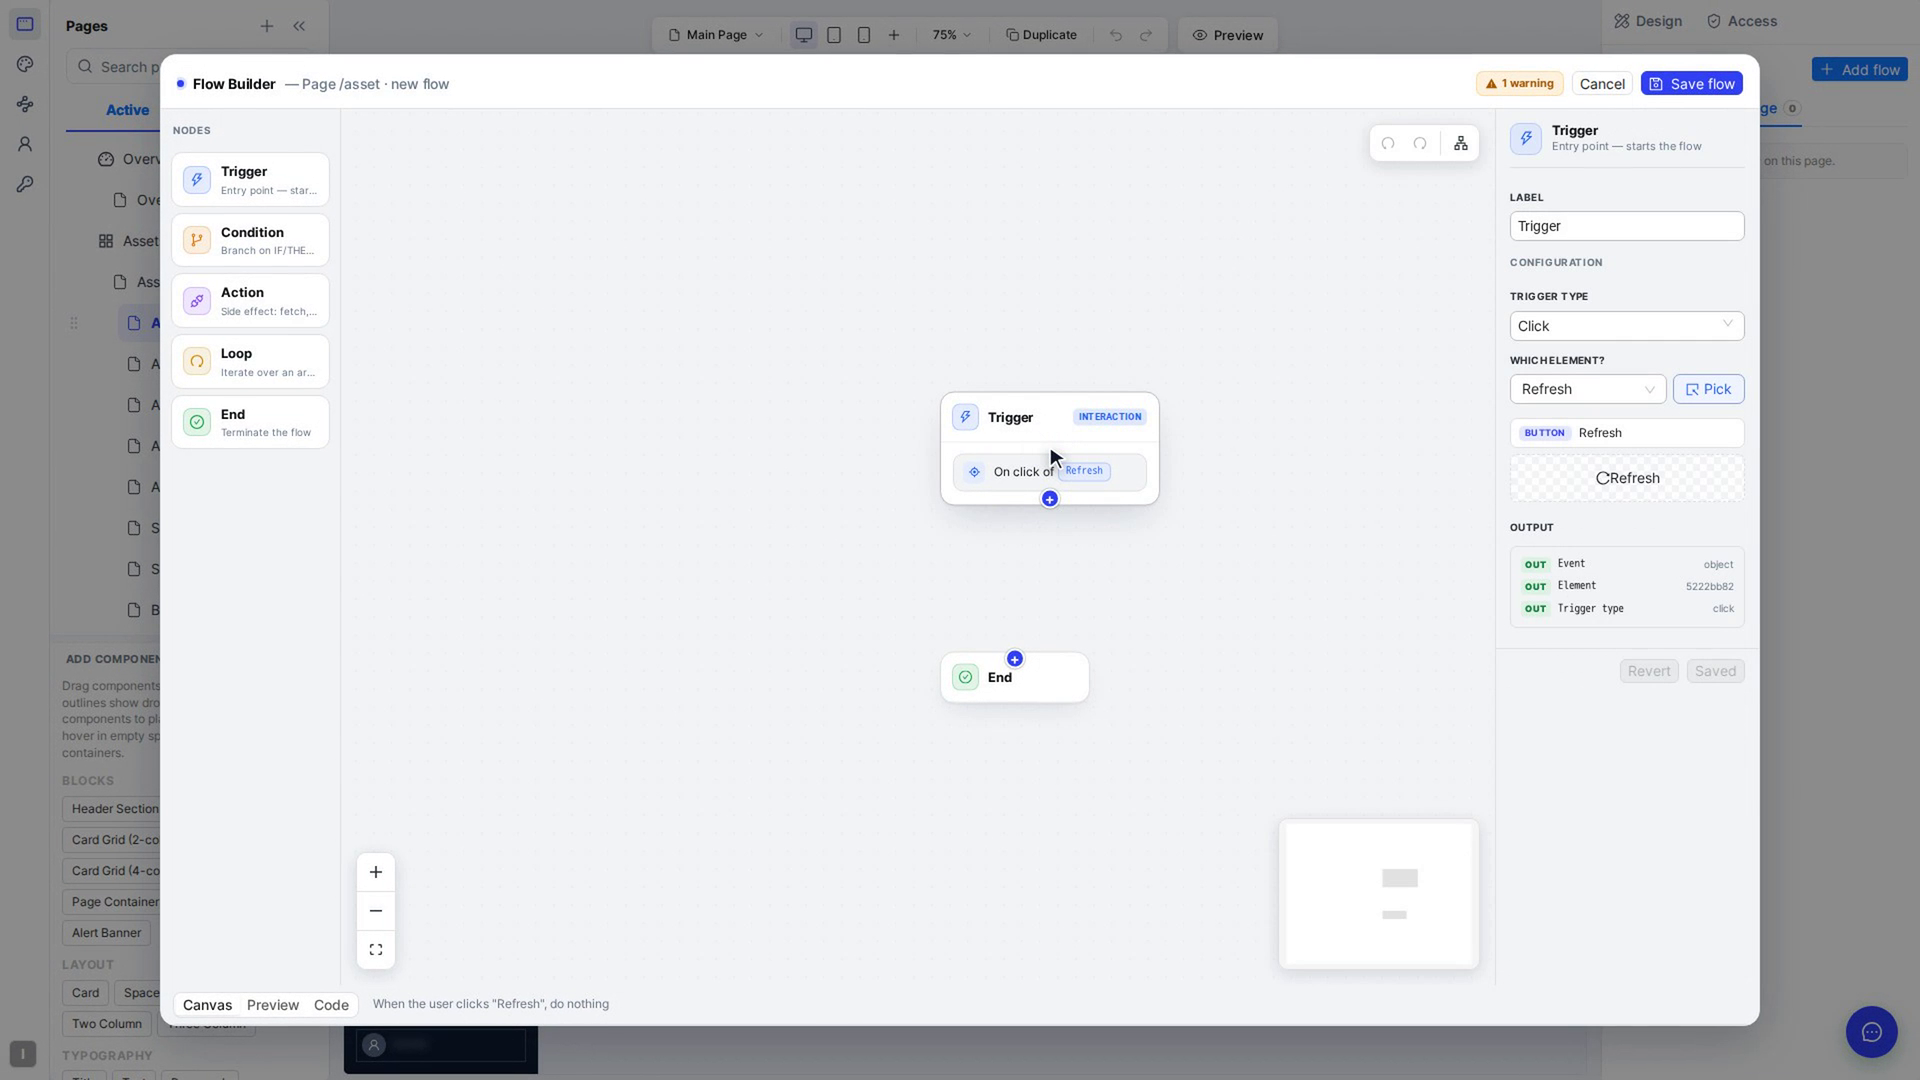
Click the Trigger box. In its settings:
- Label – a name for the step.
- Trigger type – what starts the flow. A flow started from an element is already set to Click. The other choices are grouped:
- Interaction: Click, Hover, Change (on blur/Enter), Input (as you type), Key press
- Lifecycle: Page load, Element visible
- Time: Interval, Delay
- Data: State change, Variable change
- Which element? – the element that fires the trigger. Pick it from the list, or select the pick button and click the element on the page. Its toolbar then shows Use for flow; press Esc to stop picking.
- Output – the information this step passes on to the next ones.
Add an action
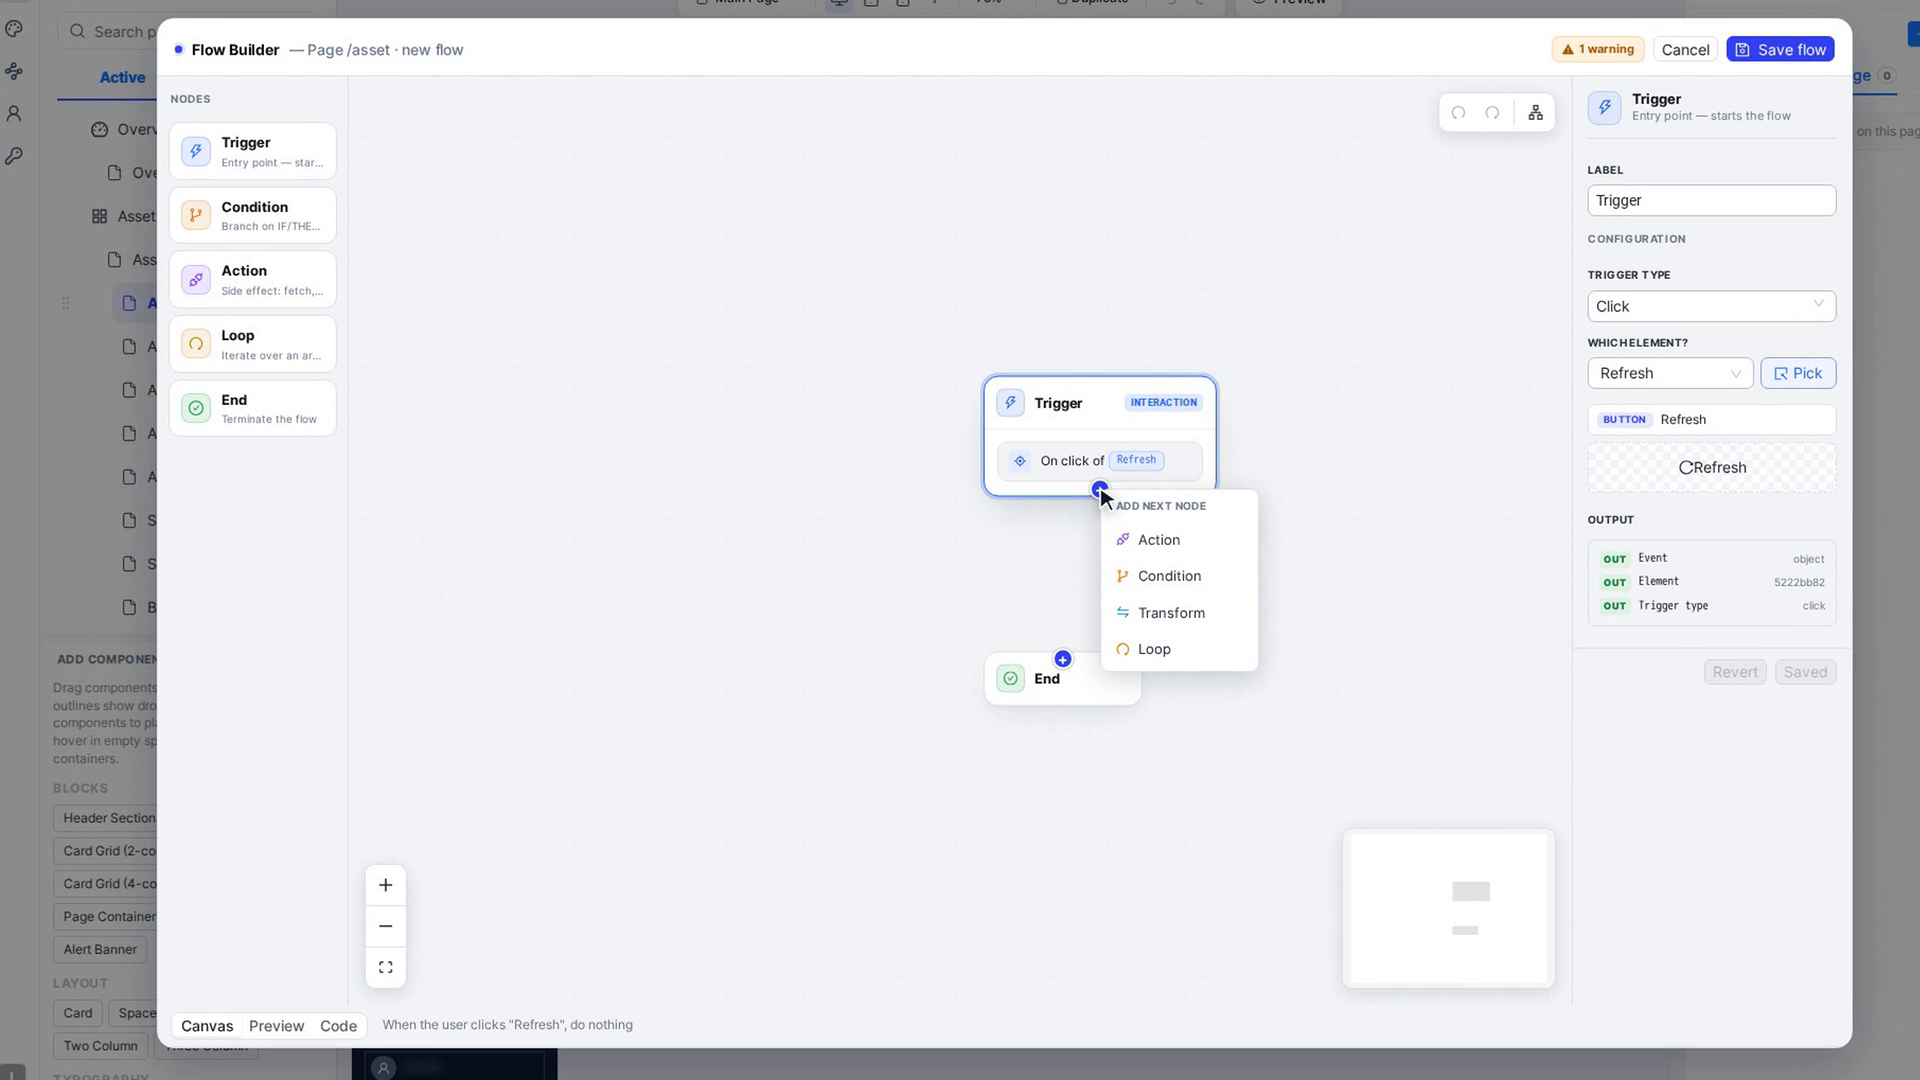
- Click the + under the Trigger box and choose Action. (The other choices are Condition, Transform, Loop and End.) The new Action box appears between the Trigger and End.
- Click the Action box to open its settings.
- Open Action type and choose what should happen:
- Element: Show, Hide, Enable, Disable, Set style – choose the element in Which element?
- State & feedback: State management, Variable management, Navigate (go to a page), Toast / notify (show a message)
- Data: Fetch (HTTP request) – call an API
- Workflow: Execute workflow – run a saved workflow
- Developer: Log – write a message to the browser console
- Fill in the fields for that type. For Toast / notify, choose a Variant (Info, Success, Warning or Error) and type the Message. Type @ in the message to insert a value from an earlier step.
Use a Condition to branch into TRUE and FALSE paths, and a Loop to repeat steps for each item in a list.
Save the flow
- Select Save node at the bottom of the settings to keep your changes to that step. Revert undoes them. Once saved, the button reads Saved.
- Select Save flow at the top right. This stores the flow and turns it on. Save flow can't be selected while the flow has errors; hover over the red error badge to see what needs fixing.
If a step still has unsaved changes when you select Save flow, you're asked to Save changes or Discard them first. Cancel closes the builder; a new flow that you haven't saved is discarded without asking.
To try the flow before you save it, select Preview in the bottom bar. Code shows the flow as read-only code.
Find your flows in the Flows panel
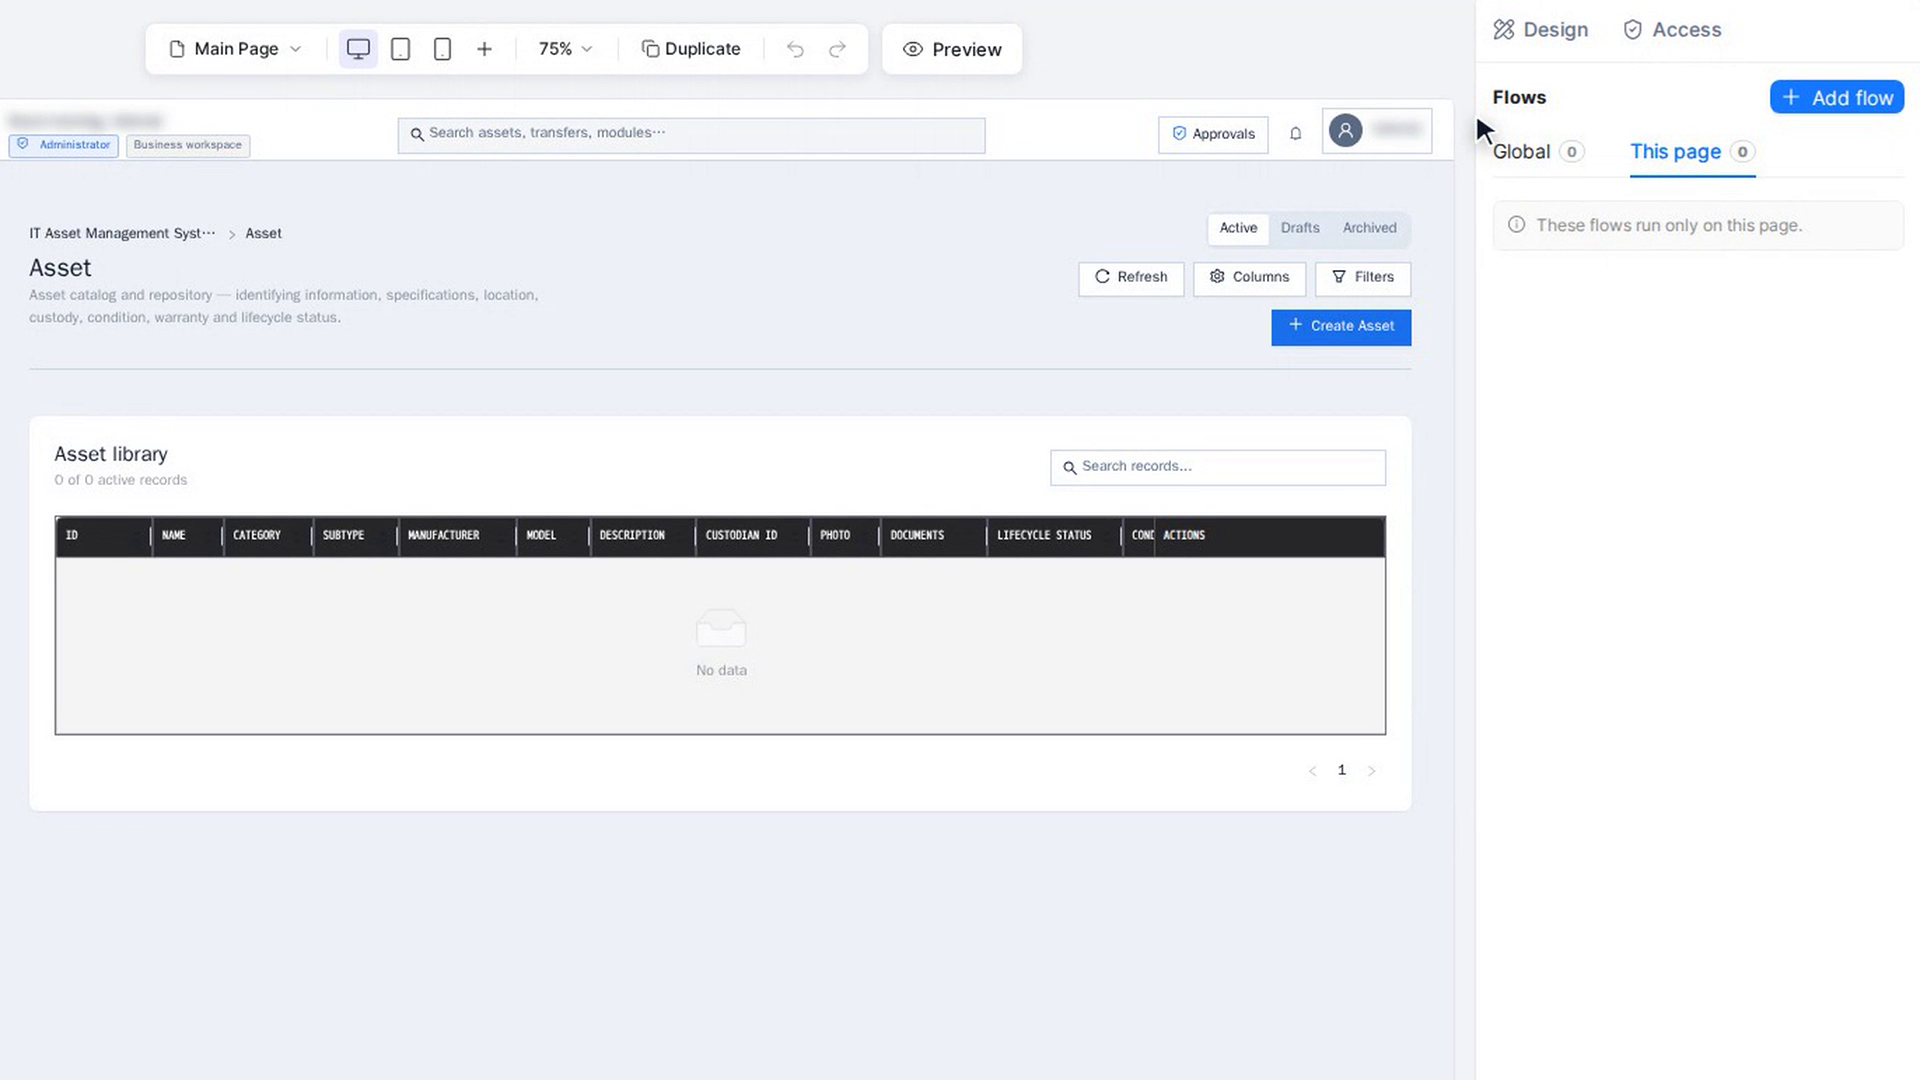
After you open Actions, the panel on the right shows Flows, with two tabs:
- Global – flows that run on every page of the app.
- This page – flows that run only on this page.
The number on each tab shows how many flows it holds. Select Add flow to start a flow from scratch: in Add a flow, choose Global or This page, enter a Flow name, choose Start blank and select Continue. Import JSON lets you paste a flow copied with Copy as JSON instead.
Select a flow to edit it. Its menu (Flow options, the three dots) offers Edit, Rename, Duplicate, Copy as JSON, Disable or Enable, Turn on dry run, and Delete. Delete asks you to confirm with Delete flow? first.
Screenshots
Step 1: Open the Flow Builder from an element
Step 2: Get to know the Flow Builder
Step 3: Set the trigger
Step 4: Add an action
Step 5: Save the flow
Step 6: Find your flows in the Flows panel
Watch how
Tip: If a flow has shown, hidden or restyled something on the canvas while you work, a Reset flow changes button appears next to Undo above the canvas. It only resets the preview, not the flow.
Delete in a flow's menu removes the flow permanently. To stop a flow without losing it, choose Disable instead.